Saturday 27 February 2016

Dropzone commander, Speedy Shaltari, Tutorial


Last year at Adepticon 2015 inside my VIG (very important gamer) goody bag was a free starter set for dropzone commander's shaltari. There was also one for hordes, I promptly traded that one away for a DZ scourge starter box.
These starter boxes then sat unopened on my shelf for the last 10 months. I have booked myself in for the DZ tournement at this years Adepticon, as such it is time to break out the paints!
First up the sneaky Shaltari!

Experimenting:
I knew I wanted a scheme similar to the default scheme so I started by priming all of the models yellow and the subjecting an AA skimmer to a barrage of inks, glazes and washes:

Some combinations work better than others.

Tutorial:
Step 1: Base coat: Army painter Demonic yellow / Any yellow
First up prime the entire model yellow. Yellow is always a good place to start when attempting to paint something orange.
Army painter sell a Demonic yellow spray can, use that!

Step 2: Wash: GW Baal red / Army painter Red Tone
Games workshop don't sell Baal red any more, however Army painter now produce something very similar: Red tone which I have tested and gives very similar results. Make sure to leave an hour so before applying the next step.
This wash will add depth to the finished model, if you are in a serious hurry this step can be skipped.
Step 3: Wash: GW Bloodletter Red Glaze
Using washes to redden yellow into orange is a lot easier than trying to paint orange directly.
Step 4: Detail: Army painter Dragon red, Black
Here the red is used to bring out the details in the large central gem and the smaller ones around the hull. This also adds a much deeper tone to the model adding some more depth. Here I have highlighted the central gem with pure red and then added a spot highlight with a pure red-orange mix. Spot highlights will help your models 'pop'.
By using red rather than blue or green for the gems we keep our entire model in the range of warm colours (red, orange, yellow), this helps the eye focus allowing the shape of the model to be dis concerned. 
Step 5: Highlights: Army painter Demonic Yellow, Drybrush: Army painter Demonic Yellow + White (50:50 mix), Gloss varnish
Army painter yellow is not a very strong paint and with a small amount of added water it becomes something close to a wash. This was applied to the forward edges of all parts of the model to imply motion. It was then applied to all of the raised points (such as the top of the central ring) to add extra depth. Because the yellow wash is so weak the model retains an orange appearance.

Next a mix of white and yellow has been drybrushed over the wings to bring out the detail there. If you make mistakes at this stage you can use a layer of bloodletter to return parts of the model to the starting colour.

Finally a layer of gloss varnish was applied to the black on the canopy to give it a reflective appearance.
The army painter white is vastly stronger than the yellow. Partly because their white paint is excellent and partly because their yellow paint is terrible!
Finished.
The above takes about 10 minutes a model, if you want to cut that down to about 2 minutes a model you can skip the highlighting, drybrushing and most of the detailing. The right model has been washed, glazed and then had the canopy painted black and the central crystal painted red. The results are nearly as good at a fraction of the time.

I hope this helps someone. Comments and suggestions welcome :)
Thanks to Angel Giraldez who first introduced me to the idea of using a wash followed by a glaze.

Sunday 26 July 2015

A blade in the back or a whip to the face!

While attending Adepticon, during clandestine dealings involving cake, I was given a voucher for a free Dark Age starter box. 

The Dark Age starter boxes are a serious concentration of ugly. Not cute ugly like a sphynx cat or cool ugly like zombies. Just pure unmitigated 'I do not want this reflected into my eyes' ugly.
The lone (sort of) exception to this, is the outcasts box; which contains several models that will fit into my upcoming secret project.
Winner of the dubious 'least terrible' award. The guy up under the K is about the level of the other starter box sculpts.
Oddly however the level of sculpting for many of the Dark age blister packs is excellent. I selected these two and escaped back to the safety of the UK.
The Warden's demonstration model apparently wasn't ready in time although they had it on display at the show.
X'cess
There is a mould defect with my example of this model as the katana is about half the expected length. I like the results though as a katana is unlikely to survive long in the wastes.
Short reforged katana. My aim when painting the model was to make the clothes look salvaged rather than purpose built.

The redwood was an experiment and I'm pleased with the results. Brown base coat, successive brown-dark red highlights followed by a brown wash.

Other than the large one on the arm I omitted the tears in the body glove. I think it looks less excessive this way.

The Warden
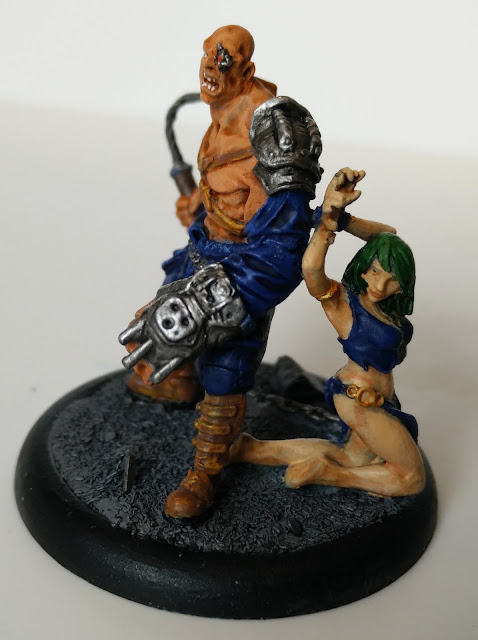
Or thoroughly unpleasant man (TUM), has brought his slave along to the battle with him. I guess this is a reference to Jabba the Hutt and Leia along with an indication of how bad things are in the Dark age universe. I didn't want to go with the obvious Slave Leia colour scheme. Slave Zelda would have been interesting however the way the slaves clothes are posed makes that untenable. My final thoughts on colour scheme were "blue, blue is good".
The leather straps started out yellow which contrasted wonderfully but it would be impossible to justify :(
The eyebrows made all the difference on the slave's face, they started out thick which made her look very masculine. TUM apparently supplies his slaves with tweezers and based on the lack of body hair, shaving facilities.
Six Pack! TUM therefore provides his slaves with regular meals and gym membership. I may have to revise his name.
The six pack isn't sculpted onto the model so I emulated the shape of a pro athlete's based on some googling. Painting the lighter colours over a solid area of darker colour worked much better than adding the fine dark lines directly.

Friday 24 July 2015

...IN SPACE!!!!

Since attending the BFG tournament at Adepticon last year, I've been building some terrain to make my local games more exciting. Also a good way to fight hobby block that arises when painting miniatures in succession.

Polymorph is great stuff for quick fun projects. It arrives as little white plastic blobs that trun transparent, soft and sticky when dropped into boiling water. Slowly returning to solid white as they cool. It also bonds to acrylic paint.
Early results


The results don't look much like 'traditional' asteroids - polymorph retains its granular structure. Instead they resemble young asteroids forming in the very early solar system which haven't acquired the mass or energy to become molten and form a single fused shape. Totally accurate, trust me, I have a physics degree....
Varying things up by making blobs before hand.
I mixed in larger preprepared blobs of various sizes and finally a plastic crystal from a pot of them I've had for over a decade now and finally found a use for.
Years of waiting

To become an asteroid
I posted the images to the star ranger forum and there a user 'Mr Wood Chuck' suggested leaving the crystal unpainted and lighting it up with an LED. I took this idea and ran with it making the asteroid large enough to hold the batteries required along with several LEDS.
Mentally I was thinking 'Jacket potato sized'
This was my first project using electronics, finally giving me the excuse to buy some wire strippers, which I've wanted since I stopped doing lab. It also allowed me to apply the hours spent in said labs to a practical purpose.
Lights on

The base, a large GW flying stand, lifts out to allow access to the insides to activate the lights or change the batteries.
Glowing from within

From this side

From below

I'm pleased with the results, now to build some more space stations :)

Everything starts somewhere

Welcome to my hobby blog :)
Here I'll be collating the photos that are currently posted to several hobby threads spread over various forums along with photos of models that don't fit into those threads and ones relating to the secret project I am working on.

To start with some pictures of the Field gun for my Kingdom of Britannia force for Dystopian legions.

I don't normally go with the standard colour schemes
 Being British myself however
I think I made the right call.
The trees are from a pack for decorating bases made by the now closed Terrain Geek.